Thursday, September 29, 2011

Custom Background Paper

Hey scrappers! I have my third and final layout to share with you today inspired by a class from boot camp last week. This class focused on creating unique and custom backgrounds with stamps from home. I have to admit, I don't know how often I'll do this because I have so much pattern paper that I need/want to use, but it's a great technique. And depending what your stamp and ink stash looks like you can have a lot of fun and express your individual creativity.

I started by picking out the stamps and colors of ink I wanted to use. I stamped a light polka dot background and then the flowers over that. I tried to layer colors and flowers in order to fill in most of the white space.


Details
  • White Cardstock: Bazzil (smooth)
  • Pink Pattern Paper: Fancy Pants 'Wishful Thinking'
  • Pink Houndstooth, Black Stripe and Polka Dot Pattern Paper: My Mind's Eye 'Blush'
  • Stamps: Polka dot-Inkadinkado, Sweet Threads Set-Hero Arts and Basic Grey
  • Apron Lace Border Punch by Fiskars
  • Stickers: Crate Paper
  • Buttons: Papertrey Ink
  • White Embroidery Thread
Thanks for stopping by, I hope to see you again soon.

Monday, September 26, 2011

Scrappin' and Stampin'

Hi scrappers! As some of you may have seen in a previous post, this past week I took part in an online scrapbook boot camp. I got a chance to learn some new techniques and wanted to share one of those with you today. The class I'm referencing today was taught by Nichol Magouirk and it focused on incorporating word stamps inn our layouts. I have done this in the past, but I wanted to share what I created for this particular challenge.

I started by picking out stamps that I thought would be appropriate for my pictures and the story I wanted to tell. Since this layout focuses on my nephew's birthday party the sentiment 'celebrate' was perfect.


In the picture above you can see the 1.5x12-inch border strip in the middle of my layout. I started by stamping in the middle and then worked my way out on either side. For this particular layout I wanted to use my stamps as a subtitle. I think in the future I'd probably make the strip thinner. Or perhaps the layout just seems too busy, but either way it's still fun...and it's done! LOL!


Details:
  • Kraft cardstock: Bazzil
  • Pattern Paper: Echo Park 'Little Boy'
  • BIRTHDAY: Martha Stewart All Occasions Cake Art cut at 1-inch with shadow
  • BOY: Martha Stewart All Occasions Cake Art cut at 1.75-inches
  • Stars: Martha Stewart All Occasions Cake Art-cut at 1, 1.5 and 1.75-inches
  • Stamps: Technique Tuesday 'Real Life By Ali Edwards' and 'Kids Are Cool by Ali Edwards'
  • Ink: Jenni Bowlin-Seed Packet, Spice Tin and Chili Powder
  • Vellum: Papertrey Ink
  • Buttons: Papertrey Ink
  • Tim Holtz Tiny Attacher
Thanks for stopping by. I hope you have been inspired to create! I always appreciate feedback and I'm happy to answer any questions. I hope to see you back here soon.

Friday, September 23, 2011

Button, Button Whose Got A Button...

Hi scrappers! Today is my first post on the Paper Craft Weekend Challenge blog. If you have visited my blog before you probably know that one of my favorite embellishments is buttons... I love buttons! I use them on cards, layouts and even home decor projects. When I was asked to create a challenge I thought it would be fun to use buttons in a way I had never tried before and share it with you, in hopes it may inspire you to create a project including buttons. Before I show you my new scrapbook page I'd like to share a couple of ways I have used buttons in the past (some of you may have seen these before).

First up is a home decor project:


I purchased this plain black frame and decided to spruce it up a little. As you can see I adhered buttons to the center of some of my flowers. I love the additional depth and texture they added to a "plain jane" frame.


Next up, a scrapbook page:


Here you can see I used buttons for wheels on my die cut car. I have done this several times and love how is spices up an other wise ordinary car.


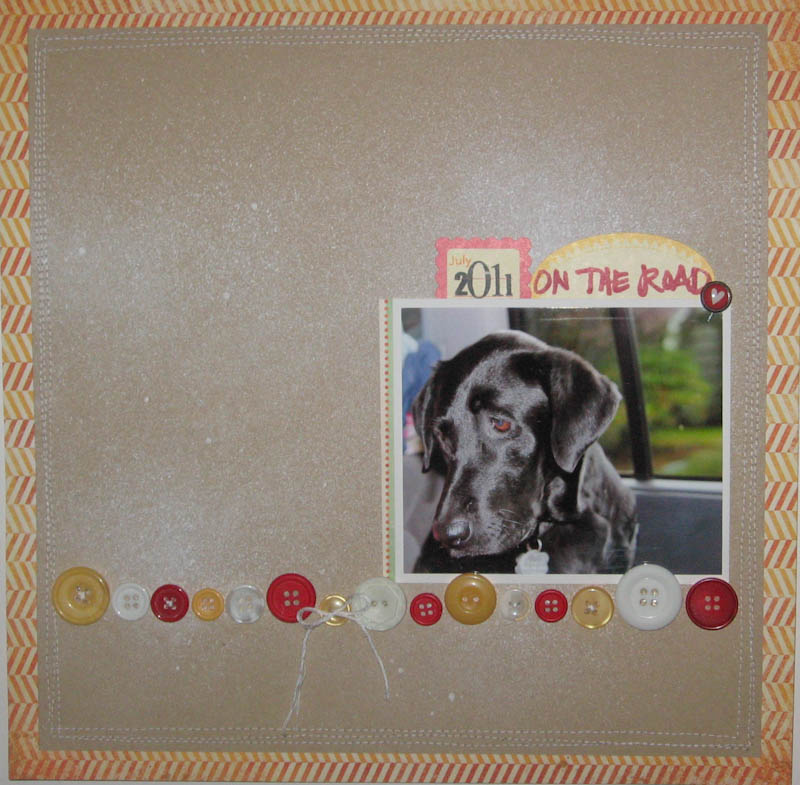
For my project today I used buttons to create a border for my scrapbook page. This is the first time I've tried this, but I think the result is REALLY fun. I kept the rest of the page very simple, as always when I create a page I want the focus to be on my picture/s.


To adhere buttons I like to use glue dots, although on this page I sewed some of the buttons straight to the paper. What I love about buttons is that they're so diverse, and you can utilize them in countless ways.


Details:
  • Kraft cardstock: Bazzil
  • Pattern Paper: My Mind's Eye 'Stella and Rose'
  • Buttons: Papertrey Ink
  • White embroidery floss
  • Labels: October Afternoon
  • Stamps: Technique Tuesday 'A Date With Ali' and 'The Observant Traveler'
  • Ink: Jenni Bowlin 'Chicken Feed' and 'Cough Syrup', Memento 'Tuxedo Black'
  • Color Mist: October Afternoon 'Paper Doily'
  • Brad: My Mind's Eye
So what is your challenge?! Buttons!!! Use buttons on a card, layout or altered item. To participate in this challenge head over to the Paper Craft Weekend Challenge and link your project. I can't wait to see what you come up with! Thanks for stopping by, have a great weekend.

Thursday, September 22, 2011

Love This Life


Hi scrappers! I'm taking part in the Scrapbooking Boot Camp put on by Ella Publishing. I'm having fun learning new techniques and have been inspired by the creativity. I heard about this on the blog of one of my favorite scrappers Nichol Magouirk, who just happens to be one of the "Design Drill Instructors". The scrapbook page that I'm going to share with you today was inspired by a lesson from Lisa Dickinson on designing with grids. I haven't really done anything like this before, but I can see how versatile it can be. You can expect to see more of this in the future.


I used three 4x6-inch photos. I used my Cricut to die cut the title. I had a piece of paper from My Mind's Eye that I used for the journal spots. I cut it in half and used part on the bottom left and top right of my page. I like how it draws your eye diagonally across the page, bringing attention to the photos. It also helps break up a photo heavy layout.

This page was quick to put together which is always a plus since most of us are usually behind on our scrapping.

Details:
  • Title: 'love', life'-Nate's ABC's cut at 1.25-inches and 'this'-Martha Stewart Seasonal Cake Art cut at 1.5-inches
  • Pattern Paper-My Mind's Eye 'Hattie and Rose'
  • Twine: Papertrey Ink
  • Buttons: Papertrey Ink and Stampin Up!
  • Journal Card and Sticker: My Mind's Eye
  • Stamps: Technique Tuesday
  • Mini Paperclip: Tim Holtz
Thanks for stopping by. I hope this inspires you to try out a new technique or sign up for a crafty class. Have a great weekend!

Monday, September 12, 2011

Back to School

Hi scrappers! I told you last week that I would share the goodies I made for my nephew's first day of school, so here it is. I went really simple on this one, but none the less they went over well with his classmates.

The supplies were simple: granola bars, pencils, twine, stamps, and a couple sheets of paper. One technique I wanted to share is how to set up your imagine when you want to use paper that is smaller than 12x12.


The pattern paper I had was 8x8 and I wanted to use as much of it as possible. So once I figured out the size of each tag (2-inches) I placed 4 on each row and then used the arrow key, which is similar to the enter button on your computer keyboard, between each set of 4 tags. You can see what that looks like in the picture above.


This photo shows all of the tags I was able to cut out on each 8x8 sheet. I love this feature because it really utilizes your paper.


And the final product. Like I said this was a really simple project, but still a nice favor to hand out in a classroom. You can click on the picture to enlarge it. I had a perfect stamp from TPC Studio which says 'first day of school' and then I added a 'from' sentiment from Papertrey Ink so I could add my nephew's name so his classmates and their parents knew where it came from.

Thanks for stopping by

Wednesday, September 7, 2011

Sending Smiles and Hugs

Hi scrappers, I've got a couple techniques I'd like to share with you today. Before I get to the card I want to apologize for the lack of pictures. My camera started acting up and all I could do was use what I had already taken. Hopefully this won't be an expensive fix, I'm keeping my fingers crossed.

Onto my card. I purchased this beautiful 6x6 paper stack from Authentique that I've been really excited to use. As I was thinking about what I wanted to create I realized I didn't have any ribbon that matched my paper, so I thought I'd try and create my own.


I started with white grosgrain ribbon from Stampin' Up, then I pulled out a few colors of glimmer mist, a pink and a red. I honestly didn't know if this would even work so I started with a really small piece of ribbon to test it out.


I combined my colors and the used my heat gun to dry the ribbon...and it worked! As I went along I compared it to the paper I was going to use and was really happy with the end result.


Next, instead of die cutting embellishments I created my own. I took the piece of paper above and cut out a few of the flowers.


I wanted to create pleating with my ribbon so I adhered glue to the back of a piece of trimmed paper. Again I apologize for the photos, but hopefully you can get an idea from the picture above.


Since the ribbon adds volume I adhered dimensional adhesive to the paper before adding it to my card.


Details
  • Base Cardstock: Papertrey Ink
  • Pattern Paper: Authentique 'Uncommon'
  • Glimmer Mist: Starfish and Tattered Rose
  • Ribbon: Stampin' Up!
  • Brads: My Mind's Eye
  • Stamp: Technique Tuesday 'Sweet Somethings'
Thank you so much for checking out my project today. I'm sorry it wasn't very in-depth, but I'm sure you all can understand my situation...it was just one of those days.

Thursday, September 1, 2011

A Card! And an announcement!

Hey scrappers! I have a card and some exciting news to share with you today. First off, the card. My sweet little girl is from Some Odd Girl isn't she adorable?! I colored her with my Copics, which some day I'll remember to take a picture of so you know which ones I used.


I used X-press It cardstock to stamp and color my image. I die cut my image with a Papertrey Ink die, I'm sorry I can't find the name off hand, but if you're interested please let me know. I inked the edges with brown chalk ink.


The pattern cardstock is from 'Simple Stories' 100 Days of Summer. I added some twine and a PTI ink sentiment and voila, we have one adorable card.

Now for the big announcement...

Allison (from Goody Bag Diva) and Caroline (from Caroline’s Craftography) are thrilled to announce their new challenge blog – Paper Craft Weekend Challenge! http://papercraftweekendchallenge.blogspot.com You can expect a challenge with a project to inspire you every Friday and Sunday. The only rule they expect you to stick to is having fun! The challenges won’t be limited to one type of machine or project – so get your materials and get ready to use your stuff. There will be some tutorials along the way – and it wouldn’t be any fun if there weren’t friends occasionally stopping by – so please come join them and get ready to get your craft on!

If you're part of the Cricut Circle you know how fun these challenges are, and if not, here's your chance to find out. I'm also happy to share that I will be a guest designer in September! I'm really excited, so stay tuned.

Thanks for stopping by, I've got to get to work on some back to school goodies for my nephew which I'll share with you next week.